
Color-coding has been added to patients so that you can create a set of colors that represent various tags or identities that you can assign to selected patients with a color coding for instant identification of that patient based on the color shown when performing a Find Patient lookup.
Only one color can be associated (tagged) with each patient record. Once a tag has been
associated with a patient, the patient line in Find Patient lookup and the patient name in Charges and Payments will be highlighted in that color.
Note: Any color assigned to a patient via a Patient Tag will only be visible in the Find Patient/lookup grid and will NOT override the color coding assigned to Appointment Reason codes or colors assigned to appointments in the Scheduler.
Updated Preferences
The Preferences on the Admin ribbon menu have been updated with a new tab that you can use to create your colors and tags.
There is a new tab in the administrative Preferences: Color Coding. Use the fields on this tab to create your unique color coding and tagging system for patients.

Updated Patient – Diagnosis/Reminders tab
There is a new field on the Diagnosis/Reminders tab in the patient record: Set Patient Tag. Use this field to select a color and/or Description for the patient.

Updated Find Patient Screen
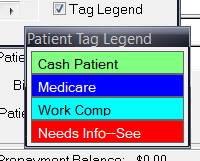
The Find Patient screen has been updated to show the color set up for each patient. In addition, there is a color legend on the right for quick reference.

To see the color legend, select the Tag Legend check box. The default value is clear. The legend will show colors that have descriptions and those without descriptions.
Updated Charges and Payments
The patient’s name on the Charges and Payments screen will now show the color set up for that patient. If no color has been set, the patient’s name will appear with black text on white background.

Setting Up Color Coding
Follow these steps to set up color coding for your patients.
- On the Admin menu, select Preferences. The Preferences screen opens.
- Select the Color Coding tab.
- Select the Use Tags check box.
- Select a color and enter the Description that you want for that color.
- Repeat for all the colors you want to set up.
- Click the OK button to save the changes.
- On the Lists menu, select Patient > Patients. The Patients screen opens.
- Select a patient.
- Select the Diagnosis/Reminders tab.
- Select a color for the patient in the Set Patient Flag field.
- Click the Save button to save the change.
- Repeat for all the patients you want to tag with a color.